As there is at least one retard who obviously can't follow instructions and managed to brick their phone using this guide I have decided to state: DO NOT FOLLOW THIS GUIDE (if you can't follow instructions).
That is all :)
Sunday, June 26, 2011
Tuesday, April 12, 2011
Otter Box Defender Series Review
Review of the Otter Box - Defender Series phone protector for the HTC Desire HD (approx AUD$60).
Sunday, April 3, 2011
Unbranding your Vodafone AU HTC Desire HD
Last night I successfully flashed my HTC Desire HD to an unbranded 1.32.* ROM. The process was incredibly easy and as such thought I would share it with you. As always, this guide come with no warranty, if you brick your phone you have been warned!
The first step is to *ROOT* your HTC Desire HD, as outlined in my guide here. Once you have completed this step then read on.
The next step is to source your unbranded ROM. This link has list of a few unbranded HTC Desire HD ROMS. I chose to use the 1.32.405.3 Shipped ROM to flash my phone with. Pick a ROM (I suggest the same one I used, 1.32.405.3 Shipped) and download it to your computer. You may have noticed that the ROM has a .exe extension. That is because this ROM will be executed on the PC and transferred (flashed) to your phone via USB.
Ensure your phone has USB Debugging enabled in Settings. Connect your phone to your PC via the USB cable and execute the downloaded ROM. Follow the on screen and phone prompts to complete the flashing process.
Once completed you will have an unbranded HTC Desire HD at your disposal. If you used the same ROM that I did then you can now repeat the *ROOT*ing procedure to gain ROOT access back to your phone. Also, at this stage your phone will have none of the apps you installed. If you use Google backup then your phone, once set up with your google account, will try and restore all your previously installed apps. I found this process painfully slow and decided to cancel all downloads and manually restore the apps I wanted.
Wednesday, March 30, 2011
How to permanently *ROOT* your HTC Desire HD
The following guide details how to permanently root your HTC Desire HD. Although I make no guarantees, this is the same method I used.
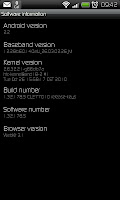
NOTE: (Apparently) This will NOT work on a phone with 1.72 OTA update released in December 2010 or any later OTA update. If your phone does have this version then check this guide for how to downgrade the OTA (not written by me). The image to the right shows my phone is running 1.32.*
Download Paul's Visionary+ R14 from here, transfer it to your phone and install. The image on the left shows the # prompt after a successful su command was issued.
Until I write a guide for achieving S-OFF status (which allows you to do more to your phone including flashing a new ROM) please have a look at this guide which I followed without any problems.

NOTE: (Apparently) This will NOT work on a phone with 1.72 OTA update released in December 2010 or any later OTA update. If your phone does have this version then check this guide for how to downgrade the OTA (not written by me). The image to the right shows my phone is running 1.32.*
Download Paul's Visionary+ R14 from here, transfer it to your phone and install.
- Launch Paul's Visionary+ and enable the ‘Set system r/w after root’ checkbox.
- Tap ‘Temproot Now!’ and wait for it to complete. If this process fails launch Paul's Visionary again and retry.
- Tap ‘Attempt Permroot Now!’ and wait again for it to complete. The phone will reboot when this process has finished. Again, if it fails launch Paul's Visionary again and retry.
- To confirm if the phone is now rooted, download and install Terminal Emulator from the Android Market, launch it and type in the command su. If you see the # prompt on the next line, permanent rooting has been successful.
 The image on the left shows the # prompt after a successful su command was issued.
Until I write a guide for achieving S-OFF status (which allows you to do more to your phone including flashing a new ROM) please have a look at this guide which I followed without any problems.
Monday, March 28, 2011
Changing the boot animation on a Vodafone Australia HTC Desire HD

The following only applies to a *ROOTED* HTC Desire HD on the Vodafone AU (Australia) network and contains no guarantees. If you brick your phone you've been warned! See this guide on how to *ROOT* your HTC Desire HD.
After rooting my HTC Desire HD one of the first things I tried to do was change the default Vodafone animation that ships with the Vodafone Australia HTC Desire HDs. Using the boot animation editor that comes with the Absolute System Root Tool app I was finding that my boot animation was not changing. I tried changing the install location through the ASRT settings with no joy. Finally, I navigated through the system files using Root Explorer until I found a file called 'VFAU_bootanimation.zip', which is Vodafones bootanimation file.
The full path of the Vodafone boot animation is '/system/customize/resource/VFAU_bootanimation.zip'
With that knowledge I then considered renaming the 'bootanimation.zip' file I wanted as a replacement to 'VFAU_bootanimation.zip'. Although there is nothing wrong with this approach it did mean that I'd have to rename each boot animation file I wanted to use.
So I decided to navigate through the phones files again looking for some kind of configuration file that defined 'VFAU_bootanimation.zip' as the animation file. I found the file '/system/customize/CID/default.xml' which contained what I needed to change.
And now finally, the instructions:
Using Root Explorer (or any real 'root' explorer) navigate to '/system/customize/CID/'. In this directory is a file called 'default.xml'. Long-tap this file and select 'copy' (or copy the file using your root file explorer of choice). Navigate to your SD card and paste the file there (in its own directory or not, doesn't matter).
Using Jota Text Editor (or any text editor app you like) open the copied 'default.xml' file on your SD card. Near the bottom of the file locate the following text:
BootAnimation animation="/system/customize/resource/VFAU_bootanimation.zip"
Delete the 'VFAU_' part, you should be left with the following:
BootAnimation animation="/system/customize/resource/bootanimation.zip"
If yours is the same, save the file and close.
Back over to Root Explorer again. Now, it would be a good idea to rename the original file just in case (if something does go wrong I'm not really sure what you'll be able to do with the renamed file, but hey, a back up is a back up). Now, locate your edited 'default.xml' file on your SD card, copy it, and paste it back into '/system/customize/CID/'. On the first attempt you will receive an error message. Copy the file a second time from your SD card and paste it again into '/system/customize/CID/' successfully.
Now when you reboot your phone it will look for the 'bootanimation.zip' file instead of the Vodafone one (VFAU_bootanimation.zip). This means we better put one there...
Open your Absolute System Root Tool and select the Download Boot Animations option. Press your phones menu key and select 'Change Install Location' and select EVO4G (this tells ASRT to install the boot ani as 'bootanimation.zip' in '/system/customize/resource/'.
You can now choose a boot animation to download (ASRT auto installs it at this point) and install. The new animation will be viewable after your first boot (reboot).
Enjoy your new boot animation.
Cheers.
Welcome to Droidalicious

Back in February 2011 I picked myself up a HTC Desire HD, well, actually I picked myself up a Nokia N8... but it was crap. I took the N8 back to my lovely Vodafone store here in Queanbeyan and explained that it was a piece of crap. They agreed, and happily exchanged it for the HTC Desire HD (yay!) and kept me on the same plan (saving me at least $10 a month, Vodafone, you guys rock).
So Why did I scrap the N8? Well, it's Symbian, and not sure if you know or not but Symbian OS sux. Originally it was a good phone OS but it's lagged behind and is too closed for real developers to utilise it properly. The N8, omitting the OS, is a good phone. Hopefully Nokia realise Android is the way to go and they save themselves eventually.
Anyway, after setting up the HTC Desire HD I was blown away. Smart phones are actually becoming quite smart... This fact inspired me to create this blog to help everyone get the most out of their HTC Desire HD.
Enjoy the ride :)
Subscribe to:
Posts (Atom)